- 3D modelling software capable of exporting an .obj file
- Blender
- Unity
-----
To get started, make your object in the 3D modelling software of your choice (for this example I am using Maya).

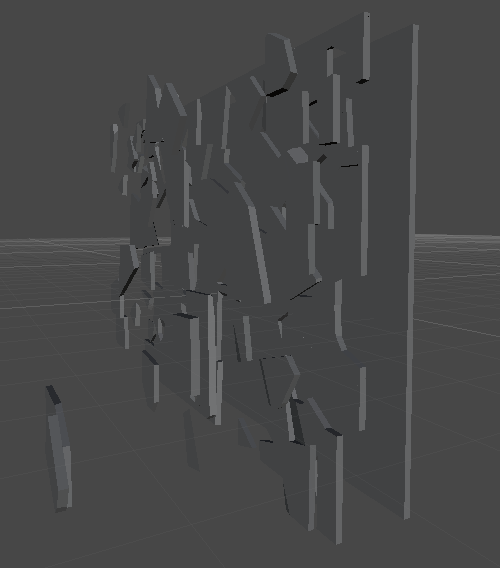
Export that object to an OBJ file and import said file into Blender. In Blender one will need to go into the plugins and turn on Cell Fracturing. With that enabled there will now be a Cell Fracture button in the Objects Tool pane when selecting an object. We'll be using that tool to separate the model into tinier chunks that we'll be using as debris in Unity. Here's also where the trial and error comes in! Playing around with the setting and testing will be the best way to make a model that will shatter in the size and way you want. In the picture you'll be able to see my favored settings. Feel free to use those and see how it works with your model.

Then press 'okay' to allow the program to work through the model. Blender will begin splitting the model on the screen. Do not interact with it or close the program, just let it run its course. If the splits you decided to make aren't too small or plentiful then the model should be cut relatively quickly.

Now that we have a model with all of the broken up pieces we need we'll once again import the entire model as an FBX this time so we can use it in Unity. Once you have the FBX dragged and dropped into Unity we can start interacting with it in the engine.
Firstly, make sure the object's imported model has the Generate Colliders box checked. As the object is right now we don't have any of the necessary components on it to do our interactions, so we'll have to add them. First off, delete the Animator component of the object. It won't be needed for this tutorial. Next we'll need to add a RigidBody, Mesh Collider, Mesh Renderer and whatever other scripts we wish this object to hold. Once those are added, before proceeding, go into the Mesh Collider tab of the object and set it's mesh to the original model of the object. This model will have been included when you exported from Blender and will look like the object without being cut up. You can also freeze the constraints of the object, choose to use gravity or alter the mass of the object while we're here.

Now that we have the object created we need to affect it in the main script we have for running the level. Where the object is made in code, we'll also have to make an array of MeshColliders. This array will house all of the chunks we made via Blender and allow us to interact with each of them individually. However two extra items will be added to the front of the array that has to be dealt with. The first or [0]'th spot in our array is the model that is used as the object's collision. It is essentially an uncut version of the object. Unfortunately it is also visible so we'll need to turn it invisible so the chunk can be noticeably affected. To do this we'll call the [0]'th spot in our array and get the object's MeshRenderer before setting its 'enabled' boolean to false. By doing this we'll be turning off the rendering of the mesh, making it so we can still interact with the object just not see it. After that there's still one more object in our array that will mess with our functions. In the second or [1]'st spot of the array is the actual uncut base model of the object. It has been passed along between all of the editors and is just sitting in our array. We have to deal with it because otherwise our chunks automatically detect that they're colliding with it and explode outward. While impressive, it isn't helping us out.
So the best way to deal with this extra model is to just delete the [1]'s gameObject. Next, the best choice of action is to create a for loop that iterates over every chunk in our array. Inside this for loop we'll apply any alterations of the chunk's properties to all of the chunks. Firstly, we'll have to add rigidBodies to all of our chunks otherwise they won't interact with things as they should. As well, we need to set the MeshCollider component's 'convex' boolean to true for all of the children, thus allowing it to react to the chunk's specific model. I also recommend turning off gravity and freezing their constraints once more, just to be safe.
Now we'll need to make and add a script to the object that will be its manager when it is struck. To have the object detect when something has collided with it we'll use the OnCollisionEnter(Collision collision) method. This method automatically detects if another object is intersecting this one. So the first thing that has to happen in this code is that it has to detect that the object that is hitting it is the actual object that is supposed to hit it, instead of say something like the floor or character (unless of course you're planning for it to collide with those). So to detect this the object that is hitting has to have it's own manager. If it does, then we can use an if statement like such: if(collision.gameObject.GetComponent<ObjectManager>() != null). Doing that will check to determine if the colliding object has the ObjectManager we're expecting to collide with.
Now we can't just simply allow the object to react since the reaction it will do will be applied to the whole object instead of the chunks it collided with. We have to determine which chunks the colliding object will be reacting with. To do this we'll need to create a new array of Colliders and set that array equal to a Physics OverlapSphere. What this overlap sphere does is generate an invisible sphere on the colliding object which will detect all of the chunks that it is going to collide with. An example would look like such: Collider[] hitCollider = Physics.OverlapSphere([Here we pass in the position of our colliding object], [and here we pass in the scale or size of the OverlapSphere. I suggest using a value from 0.5 to 1, otherwise the sphere gets too large and starts making unnatural collisions]);
Now that we have all of the chunks we're colliding with we have to iterate over all of them and interact with the struck ones. We do this via another for loop of course! This time we'll iterate over the length of the Collider array we made. Inside the loop we'll use whatever physics or interactions we wish to apply to the hit chunks.

---
And that is how you create a breakable object and interact with its parts in Unity. Thank you for reading!
it would be grate if you make 1 step by step video of this. I can’t understand procedure after importing from blender.
ReplyDeleteI'll see what I can do. I understand that it gets a bit tricky when dealing with this object inside of the Unity Editor.
Delete