Meeting someone so technologically focused like Joe was a great experience. Joe was, at the time, working as a Technical Director for Disney. He's been in the industry for 16 years, so Joe is a man with experience. He explained all of the various technical challenges he faced and gave us an important insight into what we might face if we're placed into a tech-oriented position.
He talked over what his forte or niche was, which to him was making the engine itself work. Joe liked to get down into the nitty-gritty parts of the engine and make all of the pieces fit together and work correctly. It was also a very big point to him that whenever code get's committed to a codebase it MUST be of the highest quality coding. That codebase is something that various other people may use and if it is not clean and concise in what it is doing, or if it is hard to use and easily confuses people, then it shouldn't be committed to the base.
Over his interview he also provided us with a few nifty tips that we should keep in mind when getting hired and working. So a few of the main points that Technical Directors look for when hiring is: strong proficiency in the language of that company's choice, an interest in the language so you're committed to it, knowing the ramifications of each line of code, being an excellent problem solver, and of course being a good team player. Being cocky and a know-it-all isn't going to help you impress the person hiring you. Also he explained how development kits are tricky to work with. Since development kits have extra memory built into them for debugging tools the line between how much memory a real system has vs how much memory a dev kit has is kind of hard to notice. Often times games leek over into that extra memory and when they start preparing to ship for launch the team will realize that the normal consoles now don't have enough memory. Joe also remarked how he doesn't actually find comments helpful in industry. While comments are usually a good idea in practice, it becomes inefficient in the actual workplace. Often comments are poorly done and even if they are well done they can quickly become obsolete the useless. Instead of documenting the entire process in comments, one should code their project in a simple and straightforward enough manner that anyone looking though it could piece together how it works.
Wednesday, December 11, 2013
Friday, November 22, 2013
How to: Breakable Models in Unity
Tools Required:


- 3D modelling software capable of exporting an .obj file
- Blender
- Unity
-----
To get started, make your object in the 3D modelling software of your choice (for this example I am using Maya).
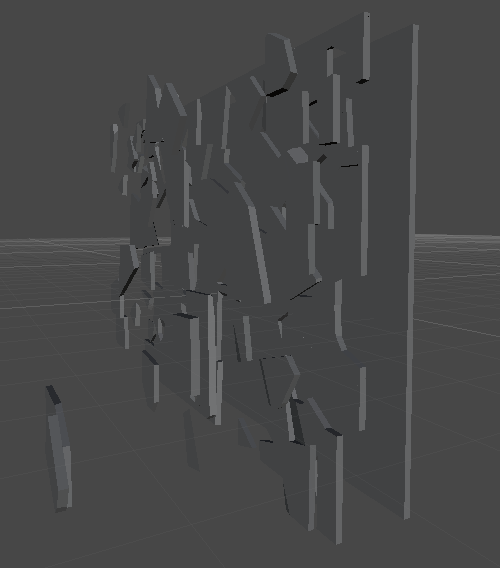
Export that object to an OBJ file and import said file into Blender. In Blender one will need to go into the plugins and turn on Cell Fracturing. With that enabled there will now be a Cell Fracture button in the Objects Tool pane when selecting an object. We'll be using that tool to separate the model into tinier chunks that we'll be using as debris in Unity. Here's also where the trial and error comes in! Playing around with the setting and testing will be the best way to make a model that will shatter in the size and way you want. In the picture you'll be able to see my favored settings. Feel free to use those and see how it works with your model.

Then press 'okay' to allow the program to work through the model. Blender will begin splitting the model on the screen. Do not interact with it or close the program, just let it run its course. If the splits you decided to make aren't too small or plentiful then the model should be cut relatively quickly.
Now that we have a model with all of the broken up pieces we need we'll once again import the entire model as an FBX this time so we can use it in Unity. Once you have the FBX dragged and dropped into Unity we can start interacting with it in the engine.
Firstly, make sure the object's imported model has the Generate Colliders box checked. As the object is right now we don't have any of the necessary components on it to do our interactions, so we'll have to add them. First off, delete the Animator component of the object. It won't be needed for this tutorial. Next we'll need to add a RigidBody, Mesh Collider, Mesh Renderer and whatever other scripts we wish this object to hold. Once those are added, before proceeding, go into the Mesh Collider tab of the object and set it's mesh to the original model of the object. This model will have been included when you exported from Blender and will look like the object without being cut up. You can also freeze the constraints of the object, choose to use gravity or alter the mass of the object while we're here.

Now that we have the object created we need to affect it in the main script we have for running the level. Where the object is made in code, we'll also have to make an array of MeshColliders. This array will house all of the chunks we made via Blender and allow us to interact with each of them individually. However two extra items will be added to the front of the array that has to be dealt with. The first or [0]'th spot in our array is the model that is used as the object's collision. It is essentially an uncut version of the object. Unfortunately it is also visible so we'll need to turn it invisible so the chunk can be noticeably affected. To do this we'll call the [0]'th spot in our array and get the object's MeshRenderer before setting its 'enabled' boolean to false. By doing this we'll be turning off the rendering of the mesh, making it so we can still interact with the object just not see it. After that there's still one more object in our array that will mess with our functions. In the second or [1]'st spot of the array is the actual uncut base model of the object. It has been passed along between all of the editors and is just sitting in our array. We have to deal with it because otherwise our chunks automatically detect that they're colliding with it and explode outward. While impressive, it isn't helping us out.
So the best way to deal with this extra model is to just delete the [1]'s gameObject. Next, the best choice of action is to create a for loop that iterates over every chunk in our array. Inside this for loop we'll apply any alterations of the chunk's properties to all of the chunks. Firstly, we'll have to add rigidBodies to all of our chunks otherwise they won't interact with things as they should. As well, we need to set the MeshCollider component's 'convex' boolean to true for all of the children, thus allowing it to react to the chunk's specific model. I also recommend turning off gravity and freezing their constraints once more, just to be safe.
Now we'll need to make and add a script to the object that will be its manager when it is struck. To have the object detect when something has collided with it we'll use the OnCollisionEnter(Collision collision) method. This method automatically detects if another object is intersecting this one. So the first thing that has to happen in this code is that it has to detect that the object that is hitting it is the actual object that is supposed to hit it, instead of say something like the floor or character (unless of course you're planning for it to collide with those). So to detect this the object that is hitting has to have it's own manager. If it does, then we can use an if statement like such: if(collision.gameObject.GetComponent<ObjectManager>() != null). Doing that will check to determine if the colliding object has the ObjectManager we're expecting to collide with.
Now we can't just simply allow the object to react since the reaction it will do will be applied to the whole object instead of the chunks it collided with. We have to determine which chunks the colliding object will be reacting with. To do this we'll need to create a new array of Colliders and set that array equal to a Physics OverlapSphere. What this overlap sphere does is generate an invisible sphere on the colliding object which will detect all of the chunks that it is going to collide with. An example would look like such: Collider[] hitCollider = Physics.OverlapSphere([Here we pass in the position of our colliding object], [and here we pass in the scale or size of the OverlapSphere. I suggest using a value from 0.5 to 1, otherwise the sphere gets too large and starts making unnatural collisions]);
Now that we have all of the chunks we're colliding with we have to iterate over all of them and interact with the struck ones. We do this via another for loop of course! This time we'll iterate over the length of the Collider array we made. Inside the loop we'll use whatever physics or interactions we wish to apply to the hit chunks.
---
And that is how you create a breakable object and interact with its parts in Unity. Thank you for reading!
Wednesday, November 20, 2013
Meeting Ryan McBride
Ryan is a developer who has been with many of the large game companies in the Greater Salt Lake area, mainly being EA, Disney and SmartBomb. He talked a lot about his experiences getting into these places and the hiring process. He started off with a small explanation of who he is and how he started. He began in the QA department of a video game development studio. Over time he learned to code and then slowly transitioned into a developer position at the company he was at.
Next he explained a few of the difference between working at a smaller scale company versus and large company. He recommended that we all start with smaller game companies for jobs. Not only are they easier to get into but they'll also be using your skills in many different aspects. This shuffling around will give you experience in multiple places in game development and maybe help you find you niche. Then once you have suitable connection it is significantly easier to migrate to a larger scale game company. Often times companies look at your completed projects and contacts before even looking at any sort of education you may have, if checking that at all even. Then out of all of the types of video games he said that mobile was the easiest to get into currently since that market is expanding more than most, then later you can consider transitioning into PC or a console based company.
So Ryan explained to us a few good ways to impress companies. The first way he said to impress them was to pick up an open-source API and build something cool with it. By doing that we'd be getting experience working with code that is not ours and showing that we can take something pre-made and develop something neat using it. The next thing was to improve your Server managing skills since many things are moving to Cloud-based, that way you can 'wow' the companies by being prepared.
Ryan discuss that in his personal opinion these were his priorities when deciding if he should hire someone:
- People Skills and Communication come first because if you can't communicate effectively it will be hard to work with you.
- He then checks how their brain works. If someone is of a similar mindset then they'll be more open to your ideas and easier to work with.
- Finally he checks their experiences and education, more oriented towards their experiences. He explained that companies want to see that you can complete a project rather than leave many half-finished.
A few extra side notes he left us with were:
- That readable code will always be superior to compact code. Just because your code has less lines in it doesn't make it any more coder-friendly. The few milliseconds you shave off with the compact code slows down the overall development time because other coders will have to decipher what's happening, rather than having the code explain itself.
- And then he listed a few goo areas for developers to get jobs.
- San Francisco
- Seattle
- Austin
Meeting Shane Smit
When Shane Smit came in to present to us he covered a few new topics as well as going into depth on a few previously introduced topics.
Firstly he discussed his experiences in industry. Most of the time people will get tossed around to various areas of the industry to help out in multiple parts of the game, especially in smaller companies or as indie developers. So one should always be prepared to learn new concepts and be willing to learn. The industry is also heavily driven by money. This should sound like common sense but people underestimate just how important it is that video games make a profit. Every time a company agrees to make a game they, usually, have to invest large sums of money. A quote from Shane touched on this topic: "Video games are a service." Now that means that we, as developers, must make sure our games fit as a service and give the users something they're looking for. That means we have to adapt to what is currently popular with our audiences.
Shane went on to discuss how we have to make a game successful based on popularity. As previously stated, we must adapt to the constant changes of the market to make sure our games are relevant to what the consumer wants. One way of doing this is by developing games after popular movies. The hard part about making movies into video games is that they both have to be released at the same time, to capitalize on the market's hype. If they aren't released at the same time the game might suffer because the movie will lose some of its hype and become less popular. So crunch time is very important for these types of games. If the game isn't released by its expected date then the company is already losing a large sum of money.
Finally he discussed how games have to come together as a whole. To make a game successful it must be solid and complete. Now that might sound like common sense too but there are many games that are 'complete' but not 'solid'. To have a solid game aspects of the game cannot be missing or lacking. If UI or sound is missing or terrible quality people won't play it because of the general unpleasantness of it. One big aspect of the game that draws people in is the menu. The menu has to be appealing and cool to make people want to play and proves that your game isn't just a crappy student project. So making the game is actually a very small part of the designing process, with a majority of it spent making tools and making those tools work with the game.
Saturday, November 2, 2013
Meeting Victor Chelaru
In our meeting with Victor he explained some of the process behind creating a game and the pipeline of people it goes through. He drew a diagram how a common pipeline would work: it starts at the developer who makes the concept for the game, then the developer passes it off to two teams; the artists and the programmers. The artists then draw up all the graphics that might be implemented in the game before passing those assets onto the programmers as well. The programmers then have to take all of this and make it into a workable game which is then sent off to marketing to promote. The problem with this way of doing this is that there has to be a constant dialog between the programmers and the artists / developer. And each dialog that has data loss, ergo some of the idea is lost from the developers original idea to what the programmer completes. Victor estimated that about 10% of the information was lost each step, so by the time it got to the programmers it could be as low as 50% of the original information that was intended to be passed along.
A fix for this, that Victor proceeded to speak about, was cutting out the middle man. Ergo he said that the developer should be as much of a programmer as possible, therefore negating the information loss. By doing this the game's core concepts are all there. As for the artists he explained how they should have an easy enough time implementing their assets into the game so they can see how it works and fix it as needed, thus removing the dialog between the programmer and the artist as well. Now this is the best case situation and it may be hard at times to even come close to achieving a pipeline such as this.
To finish he spoke about our goals and how we need to focus on what we truly need. As programmers & developers, we shouldn't try and expect what to do way ahead of time. If we try to predict everything we'll never actually get anywhere with coding it, we'll be stuck in the theory stage. Also the best feedback is from those who aren't developers or programmers, and who aren't afraid to hurt your feelings.
Tuesday, October 22, 2013
Meeting Aaron Walker
Aaron works at Disney and when he came to present to us he
brought a very professional manner to it. His presentation had a seriousness to
it as he discussed what we’d be facing in our futures exactly. I enjoyed his
presentation due to the fact that I learned what to expect.
Firstly
he explained that learning never stops; a coder must always be ready to expand
his knowledge. In most of his experiences he coded in C++, which is the
language we are currently studying most. He went on to explain how it is best
for someone to find their ‘niche’ spot in coding, whether that is physics, UI
development, etc, etc. By having a niche specialty companies and coworkers know
exactly what you’re good at and they can rely on you in those aspects. One of
his quotes, which I’ll share, also portrayed the importance of handling
whatever task is given to you: “To be successful, work hard and do anything
they bring to you.” If one is to follow this quote then to be successful one
has to be an important asset to whichever company you may be working for; doing
so will lead to you getting more responsibilities and trust from your company
and people will come to you because you can get the job done.
Further
on in his presentation he explained how his company worked in their creation
process. One thing that he made sure to drive home was that every game they
created has a crunch time, or a Code Red as they called it. As a developer you
must be able to motivate yourself through these times and get the job done; but
maybe even more important than that is having something that in the end you’re
proud of. If you’re not proud of what you’re doing then you’ll be less motivated
to continue. So it is quite important to find that motivation to make something
amazing. A good helpful tip he also gave us was to make release versions of our
product to test how it runs without all of the debug code holding it together,
that way we can foresee any problems that may be experienced in the user’s end
result.
Throughout
all of his presentation I learned just how intense the coming jobs would be. I
can’t just freely go into a job expecting it to be fun without any hard work.
To truly succeed as a Video Game Developer I’ll have to work hard and motivate
myself to make a product as great as possible.
Meeting Rich Reagan
Throughout Rich’s presentation he was very well-spoken and was funny enough to keep the audience interested, not that we weren’t already interested to begin with. He went on to discuss how games are developing and how the video game market has to adapt to that changing market. If we can’t adapt to the market then our video games will go out of style, much like the cassette player did once MP3 players were produced. Due to smart phones more and more people, who aren’t avid gamers, are getting easy access to a variety of video games. This opens up the video game market to many casual gamers such as the older generations and those who are just barely coming into video games, so these games must be marketed to this new audience as well as interesting those already familiar with video games.
An interesting trend that Steve pointed out is that
games are beginning to go ‘freemium’, which means that the game is released for
free and either some content of the game requires money to buy or the game just
repeatedly asks for appropriate donations for their effort. With the video game
genre expanding to reach broader audiences the freemium style of producing
games is becoming more prevalent. But by going with the freemium route those
video games must be fun, or addicting enough, to make people willing to pay for
that content. For example, the player could farm for hours to get a decent
quality item or they could pay a small sum of real-world money to acquire an
item of superior or unique quality. Doing this perfectly means that the player
is willing to make that small micro-transaction because they believe that it is
beneficial for them to do so. On the other hand competition drives freemium
purchases. By having players compete amongst each other they’ll be much more
open to giving money in order to gain an edge or some aesthetical value that
the other players may not have.
Given all this information, I learned how we, as
developers, must learn to view the changing tides of consumer and make fun
games that reach out to those audiences while still being profitable to our
company.
Tuesday, September 17, 2013
AI Decision Trees
To begin implementing AI into any game, one must first design how the machine is going to think and react. The easiest way to do so is through a decision tree. A decision tree is like a branching river; the flow goes in one direction but the branching paths might lead the flow in drastically separate areas.
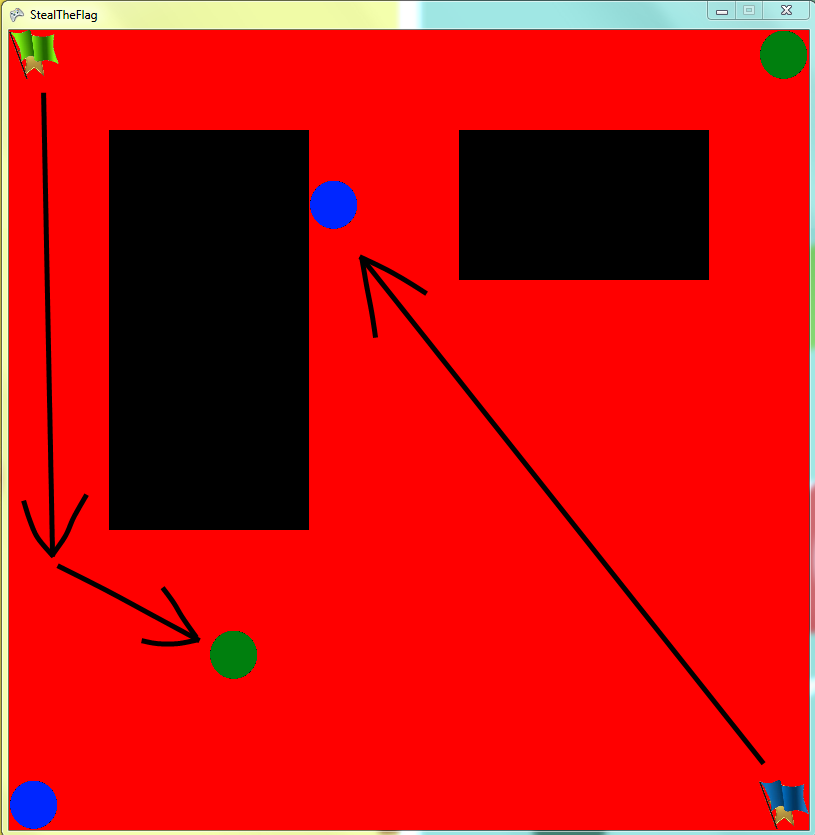
The basis for designing a decision tree requires that your AI has states to keep in mind, such as moving to a designated area and then moving back. As a start, here is the image of my AI example with all of the players in a resting state.

At this point their current state was one of doing nothing. They just sat there until I gave the program the right to start. But once they began, the Decision Making started.
---
The players at the top-right and the bottom-left of the screen are classified as defenders, whose job is to only stop players when they've picked up one of the flags, so their decision tree is telling them to sit there and wait until someone takes the flag. The other two players begin moving towards the opposing flag immediately since their decision tree dictates them to do so.
---
But why does their decision tree tell them to do so? Let's take a closer look at the decision tree involved with their movements.

Firstly there exists an overarching Decision Node. Inside this node is the "question" that it must ask, in this case that question is "Does the player currently have the flag?". Every update of the program, this Decision Node checks its question and then decides how the player will react based on the result it has found. Once an answer has been found, the Decision Node will direct towards one of the State Nodes that come along with it. These State Nodes exist simply to change the state of the player into whatever the State Node's are programmed to contain. In our example this means that if the player currently has the flag, the Decision Node will direct him to the Return to Base Node and the player will understand that he need to return to base.
Now Decision Nodes don't always need to come to an abrupt end with State Nodes. Decision Nodes could always lead into other Decision Nodes and deepen the logic further. This manner of layered Decision Nodes is what gives alot of the game's AI the ability to think, or to at least pretend that it is thinking.
---
So now that we understand why the player is moving the way he is, we can easily understand how the defenders work.

The defenders are looking for the signal when an opposing player picks up their flag. As soon as they do the Decision Node gives the defenders a new order to seek out the enemy and reclaim their flag. Their Decision Tree is very similar to the attackers, except that their only states are "defending" and "seeking".
Since the Decision Tree is nearly constantly updating, the player's will always be complying to one of their two states. Therefore when one of the defenders hits the player and returns the flag (as seen in the example with the top two players) that player will then automatically seek out the flag once again. This makes it so there is never an interruption in logic.
The basis for designing a decision tree requires that your AI has states to keep in mind, such as moving to a designated area and then moving back. As a start, here is the image of my AI example with all of the players in a resting state.
---
The players at the top-right and the bottom-left of the screen are classified as defenders, whose job is to only stop players when they've picked up one of the flags, so their decision tree is telling them to sit there and wait until someone takes the flag. The other two players begin moving towards the opposing flag immediately since their decision tree dictates them to do so.
---
But why does their decision tree tell them to do so? Let's take a closer look at the decision tree involved with their movements.
Now Decision Nodes don't always need to come to an abrupt end with State Nodes. Decision Nodes could always lead into other Decision Nodes and deepen the logic further. This manner of layered Decision Nodes is what gives alot of the game's AI the ability to think, or to at least pretend that it is thinking.
---
So now that we understand why the player is moving the way he is, we can easily understand how the defenders work.
Since the Decision Tree is nearly constantly updating, the player's will always be complying to one of their two states. Therefore when one of the defenders hits the player and returns the flag (as seen in the example with the top two players) that player will then automatically seek out the flag once again. This makes it so there is never an interruption in logic.
Tuesday, August 20, 2013
A* Pathing
A* pathing is a simple way of calculating how an AI can get from Point A to Point B in the most efficient way. The code does this by calculating which node has the least cost expended when it travels there. In the following list I'll be going step by step through what the code does when it calculates through a simple path:

- So first, we designate the starting node and the ending node. In the example picture we use A & F.
- To begin we start with the starting node. That node is then placed on the open list.
- Put simply there are two lists we use in A* Pathing to keep track of what we've stepped over and what we are considering.
- The Open List is the list that all of our currently examined node sit in.
- The Closed List is a list of all of the nodes we've stepped over or 'completed'.
- Then we calculate the connections to our starting node. For our example A only has one connection, B. but if it had more than one connection we'd calculate all of those as well. By calculating I mean that it finds the Heuristic and Cost to move to B, as well as the Estimated Total Cost it will get to the ending node.
- The Heuristic is a value for how far away the current node is from the ending node. There can be many different ways of calculating this value, but the simplest is to use a bird's path or straight line from the current node to the ending node.
- The Cost So Far is how far the node has moved from the starting node along the path. Each path has a 'distance' and as we move through the path we keep track of the cumulative amount of that 'distance' for this variable. In the example, A has a Cost So Far of Zero because it hasn't moved at all yet.
- The Estimated Total Cost is, simply put, the sum of the Heuristic and the Cost So Far.
- Once we have calculated all of the connections to A, it is put on the closed list.
- Then we figure out which of the nodes on the open list has the least Estimated Total Cost. Once we find that we continue with the steps for the node A.
- For the sake of my fingers and your eyes, we'll skip over the process for the B node since its exactly the same as A's.
- Moving onto C, we can notice that there are now two nodes it connects to. So we calculate both of those just like before and then more C onto the closed list.
- Because D has a lower Estimated Total Cost than E, our program should continue on with D and put E to the side on the open list for now.
- Then once D is done calculating and is moved onto the closed list, F is chosen next because of its still lower Estimated Total Cost than E.
- Then there's some simple logic for figuring out the end condition. The simplest way to do so would be to just have the program consider when the end node is selected but there are other end conditions where coders choose to have it so "when every node is on the closed list", that way every possibility is checked.
Now some of you might ask "But Daniel, what if E's connection to F is shorter than D's?" and the answer is simple. The way A* Pathing should work with its calculations means that if D's connection was larger, for example 7 instead of 3.5, then that would make F's Estimated Total Cost larger than E's on the open list and then we'd check E. This of course would make us reevaluate F's values and since there's no other open nodes to check we simply take F, which is the ending node and causes the ending condition.
Wednesday, May 1, 2013
Bomb Diggity - Handling Game States
In the latest rendition of Bomb Diggity, I came across the problem of retaining the same game state when accessing our in-game store menu. Due to how it was originally coded we'd erase the game state when accessing the store since we had intended for it to be a mid-point between accessing new levels. But now that Bomb Diggity has been coded to allow the player to access the store mid-game I realized that we'd be destroying the player's current field, thus not giving them the option to continue with the same level without having to restart.

The solution that I came up with to fix this problem was changing how our game states were handled. Instead of deleting and recreating the same level whenever we entered the shop, I coded it so that the game states existed simultaneously. By creating both the level and the shop simultaneously the player was able to enter the shop without wiping away their current progress. A minor problem arose since both of them existed simultaneously and the shop was overlapping the level and not allowing the player to actually play the game. That was fixed by altering the "Visible" variable included with the game state and making the shop not visible to the players. Then when it was necessary to enter the shop all that needed to be done was change the variables so that the shop became the visible layer and the game level became invisible; then once the player is done it is simple to reverse the process and leave them right where they left off.

Example of Problem
The solution that I came up with to fix this problem was changing how our game states were handled. Instead of deleting and recreating the same level whenever we entered the shop, I coded it so that the game states existed simultaneously. By creating both the level and the shop simultaneously the player was able to enter the shop without wiping away their current progress. A minor problem arose since both of them existed simultaneously and the shop was overlapping the level and not allowing the player to actually play the game. That was fixed by altering the "Visible" variable included with the game state and making the shop not visible to the players. Then when it was necessary to enter the shop all that needed to be done was change the variables so that the shop became the visible layer and the game level became invisible; then once the player is done it is simple to reverse the process and leave them right where they left off.
Example After Fixing Code
Subscribe to:
Posts (Atom)