Friday, October 16, 2015

Game Design Analysis - Delivering Dread 2/2

As a continuation from last week's post this week we'll be discussing the delivery of dread through subtle scenes and audio, my preferred style of horror. Unlike jump scares, creepy environments leave a much more lasting impression on players. Down the line a keyword or image can invoke a chain reaction in the mind to bring that scary scenario back to the players. Jump Scares leave players with: "A thing jumped out at me. I flinched." While carefully crafted scenes leave players with: "So there was this creepy [location]. In it was [monster] who [did nasty things]. It was awesome. I had chills." The difference clearly being that scenarios and environment leave the players with a story to accompany those scares. I'm not saying that jump scare games can't have stories, it's just that jump scares games have to rely on a different mechanic or story telling style to get across the same effect.
The notable examples being: Slenderman vs FNaF. Slendy has no story. He's just a monster and you're some guy in a bad area. Pure jump scare game. Meanwhile FNaF has an underlying story that was carefully crafted to be hidden, making players want to search it out to try and uncover it all.

I can't say one way of doing scares is better than the other, it all comes down to what type of game is being designed. But it is a simple truth that if one relies on sound and the environment to set the tone then those scenes that creeped a player out will stick with them for much longer.

---

So how does one make a scenario scary? The two different paths one can take are: visceral environments or visceral experiences. The difference between the two is that in environments players are lead through the scares, while experiences are discovered naturally by the player. These two different paths are also not exclusive so the experiences can be combined with the environment; in fact, experiences are usually enhanced by a quality environment.
Spooky vs Not Quite as Spooky
Visceral Environments are any type of scene that is disturbing or spooky to the players. Instead of having a monster right off the bat this type of horror relies on the fear of the unknown. In this desolate decrepit castle is there vampires, a bundle of corpses sewn together or vengeful ghosts? We're literally in Hell, what will we find here; demons, sinners, a racist grandma?! The player will only know if they progress through the environment. Games that focus on a slow drawn-out environment and storyline usually take forever to actually show the monster to the players. It's always just a passing shadow or ominous rumor, only truly being revealed at the apex of the story when the tension is at its highest and the player has learned all they need to regarding the lore.
A good example of this style is the Amnesia games. The character wakes up in a castle with no memory, then must progress ever downward to find the truth, and the monster doesn't even appear until a decent way into the game. The entire time before the monster even shows up is littered with some exposition flashbacks topped with the occasional jumpscare to keep the player nervous.

Visceral Experiences are quite similar to environments except that it is more on the player to discover the horror. What that means is that there has to be aspects in the environment that keen eyed players can notice without it being directly revealed to them in a "ta-da, here's this thing" moment. The proper way to do this is with subtlety and having faith that your players will find what you want them to find. It could be as simple as corpses but something is off with them, just odd enough that the player knows that something weird happened. The player should always feel that there's something else going on underneath the surface.
The example I use for this one is from SOMA (another Frictional Games game, huh... I promise this isn't sponsored) and it is also one of my favorites. So you're walking along all alone through this strange facility, you've seen a couple spooky monsters and had your fair share of this environment, then you start coming across headless corpses. Odd, right? Well time to explore and find out why there is some headless corpses. After a bit you come back and... One of the corpses has been moved. Not far, but it has definitely been moved. The problem is that you were gone from this room for maybe thirty seconds and there was no way a monster got past you to do that. Were you hallucinating, was it actually always there? Did the headless corpse move on its own? Or even worse, is there actually a monster that somehow did this and are they still nearby?

Happy Spookin' Gamers!

Friday, October 9, 2015

Game Design Analysis - Delivering Dread 1/2

Before we begin; yes, this is a obligatory spooky post for October.
Oooooh, so spooky!
This will be part one of a two part analysis on the sense of fear and dread in video games. This post will focus on delivering dread through frightening visages and 'jump scares'; with the following post focusing more on the dread caused by subtle scenarios and audio.
Both posts will talk about scares that happen in popular video games, so [Scare Spoilers Ahead]? However no story will be discussed, so you're safe there.

---

So the first thing that comes to most people's minds when you begin discussing scary games is horrifying sights, usually accompanied by sudden loud noises. These are affectionately(?) referred to as 'Jump Scares".
Jump Scare Simulator... Now please flinch.
The most notable games that use jump scares is the Slenderman Games and the Five Nights at Freddy's franchise; both of which are games that all gamers probably know about, willingly or not, and both of which are/were pretty popular. The main draw of these jump scare type games is the sudden shock each player experiences (usually when they die...). Every time those monsters jumps out of the darkness the players experience a rush, that shock and brief moment of panic. Those moments are what most players want to feel, and what most player want to overcome to succeed. It is akin to a right of passage. You came, you saw, you flinched and you finally succeeded in overcoming the shock to win the game. To be a successful mechanic jump scares have to be spread out or unpredictable enough that the player can never expect when the next one will come. In Five Nights at Freddy's this is the moment when players check on the doors and peer out into the darkness. While staring out into the darkness the players have to pause and make a sudden decision that will decide if they live or die and the wrong choice ends with a, sometimes adorable, animatronic ripping you to pieces.

While the shock tactics of jump scares are common place and most known by gamers they are also leave little impact overall. After the initial flinch and a second or two to collect oneself there isn't a lasting feeling of dread. One spike in adrenaline and then that's it. If jump scares are too common place in a game then they also become a nuisance more than a frightening mechanic. So there is a fine line that one must ride when crafting a shocking experience.

Friday, October 2, 2015

State Machine AI

State machines are the easiest of all AI's to program. They are simple but that also makes their 'intelligence' simple. In a sense they are just glorified switch statements that get told what type of responses they have and then check versus whatever input they receive.

Now lets talk about state machines in a much less abstract form!
What you need to begin is a variable that keeps track of what state the AI is currently in. I prefer an Enum since you can name each state with a unique title, but you could also simply use an Int so long as you can keep track of which state is which number.
Next you have to set up a hierarchy or tree that your AI will check against to tell it what state it should be in. This hierarchy is one way to help define how 'smart' your AI is and how complex its actions are. For ease of an example lets say we're building an AI for capture the flag.
Something like this. Or something much, much bigger. Your choice.
Finally you need to simply set up a switch statement in the AI's update that checks against whichever state it is in and then provide the adequate response.
And that's it. State machine AI's are pretty simple and fun to make (at least I think so).
---
Now for some example code!

void AIUpdate()
{
    CurrentAIState = CheckDemStates();
    
    switch(CurrentAIState)
    {
        case AIState.Attacker:
            //Seek out the flag
            break;
        case AIState.Defender:
            //Cover our flag
            break;
        case AIState.Rescuer:
            //ZOMG, get our flag back!
            break;
    }
}
 
AIState CheckDemStates()
{
    if(//they got the flag)
    {
        if(//Rescuers > X)
        {
            return AIState.Attacker;
        }
        else
        {
            if(//Other teammates are closer)
            {
                return AIState.Attacker;
            }
            else
            {
                return AIState.Rescuer;
            }
        }
    }
    else
    {
        if(//Defenders > X)
        {
            return AIState.Attacker;
        }
        else
        {
            return AIState.Defender;
        }
    }
}

Wednesday, September 23, 2015

Game Design Analysis - Dungeons and Dragon's Concentration Mechanic

To begin, allow me to give a proper explanation of how Concentration works in DnD. I'll be talking about it in from a 5th Edition standpoint but older editions that have Concentration work much the same, the only real difference is that Concentration used to be a Skill where it is now just a Constitution Saving Throw (ergo, the heartier you are the more damage you can take while focusing on your spells).
Muscle Wizards are actually kind of a thing...
So imagine Concentration Spells as if they are tagged with a "Unique" modifier. What that means in game terms is that there can only be one instance of a Concentration spell at a time. So for example say you cast one spell that required Concentration, in order to cast another spell that had Concentration you'd have to cancel/abandon your first Concentration spell.
*Mana not always located in the knees*
If a player also takes damage while Concentrating on a spell then they must make a Constitution Save versus 10 or half the damage you take (whichever is higher). If they fail that save then they lose the spell they're concentrating on. That means if a player is flying high up and they take an arrow to the face they'd better hope they pass that save.
Avoid having this happen
There are some other cases that a DM might require a Constitution Save to maintain spells, however that depends on how 'hardcore' your specific DM wishes to play. Some may only call for it on receiving damage while others may call for it during any stressful/difficult situation, such as while riding on a crazy uncontrolled careening cart or during a oceanic adventure and your character is sea-sick.

---

Mechanical Analysis:
I believe this 'Unique' Concentration system was implemented due to the previous editions' buff mode. What I mean by that is previous editions didn't require Concentration for most buff spells (+AC, +Ability Score, etc) so most fights would start with the Wizard and Cleric buffing everyone to god status and fights would turn into a game of rocket tag (read as: everyone so crazy buffed that the first one to land an attack usually OH-KO's the other). Therefore Concentration was revised to make it so only one of the very useful buff/utility spells can be used at a time.
This change to Concentration makes it so casters can offer up a more unique answer to situations. Certain scenarios may call for Ability Score buffs or maybe something as simple as the ability to fly. With these scenarios smart players can feel like they always have an answer or a mechanic to add to the fight that will tilt things in their favor, but there-in also lies a drawback.

For Arcane casters they would have to go around and gather/memorize all these utility spells and for Divine casters they have to prep their spells ahead of time, so players may fight it difficult or annoying to plan for these situations unless the DM provides them with a pretty obvious clue about what's going to happen. The players have to be creative with the spells they have.
The other main drawback that many players express when looking at Concentration is that it seems too easy to break Concentration (hell, there's even a feat for doing exactly that called Mage Slayer). While I agree that is has become significantly easier to break Concentration, I think that it is a fair balance for casters. In previous editions past level 10 or so with straight casters (like Wizards) get incredibly strong, practically gods compared to the more martial way of fighting (ergo sharp/pointy/bludgeony things).
*Just a rough example, not a perfect demonstration*
Now, with Concentration, Wizards aren't these almighty figures and it brings them down to level with the other classes. They are still powerful but they have to play around certain opponents as well as planning out their spells and that makes combat actually interesting for casters. Instead of holding a person in place magically and flying off while peppering them with fireballs they have to choose between flying or locking them in place before raining the fire.... When talking about it like that it still seems powerful but I promise you it is better to add these limitations to prevent reality warping magic gods from running amok.

Lore Analysis:
In the end Concentration offers up a level of realism that would come with casting magic (I like to think that magic is similar to programming!). Imagine with me for a moment that you're a powerful Wizard and you wish to fly you and your allies up a cliff. Each turn you must mentally keep track of where your allies are in space so your spell can keep them aloft, as well as automatically moving everyone along with the world's rotation (lest your party suddenly become a Mach-1 bullet through the nearby village). That's a lot of math and variables to keep track of. So if you were up there in the sky doing advanced mathematics and some jerk blasts you in the chest with an arrow you may slip up with some of those numbers. And all of that example is just for the spell Fly.

As a DM it is a good exercise in imaginative thinking if you put yourself into the role of a Wizard and figure out why some of these spells have the Concentration tag attached to them. The answer could be as simple as applying an equal force in the exact opposite direction to the force being used in attempting to move (Hold Person); or as complex as stimulating every cell in another adventurer's body to induce a higher state of regeneration or enhancing the spine to increase reaction time and reflexes (Enhance Ability). Simple stuff, right?

Tuesday, September 15, 2015

Directional Hit Detection with Dot Products

Note: Before proceeding with this article, please make sure you have a basic understanding of Dot products as I will not be covering them in this post. That may be a topic for a future article. :)

To begin lets say that you have two objects; one doing the shooting and one being shot. We'll call them Gun (Shooting) and Enemy (Being Shot).


Since all of the math will be calculated around the Enemy we'll first need to get the Vector3 from the Enemy to the Gun, which can be done by taking the Enemy's position and subtracting the Gun's position (Enemy.position - Gun.position). We'll call this variable the Direction Vector


Next we'll have to calculate the Dot product of the Direction Vector around the the Enemy's Forward and Right Vectors. Doing so we can get some values which will help determine which 'quadrant' the Direction Vector is in, which can be used as a basic direction. For convenience I usually put these values into a Vector2, the X being the "Front-Back" value and the Y being the "Left-Right" value.


Now to explain what these numbers actually mean; you may have already guessed what they stand for because of my Front-Back-Left-Right names. So if the X (Front-Back) value is positive that means it is pointing in the same direction as the Enemy's forward, thus it is being hit from in front. And if it is negative then the Enemy is being hit from behind. Similarly, the Y (Left-Right) value works the same; with Right being positive and Left being negative.
Finally just compare the absolute value of the two values (X & Y) and the bigger value is the one that is closer to the point of impact on the Enemy.


Following this article should get you to detect collisions on the cardinal directions (Front, Back, Left & Right). However this can also be taken further to provide omni-directional detection by checking the corner cases. It should be noted that this method only works on 2D collisions, as there is no code to check for shots from above or shots from below (however is some cases those could be considered your Front-Back depending on the type of game being coded).
The following will be some example code; it should be noted that I am generalizing a Dot Product and Absolute Value functions so you'll have to make those yourselves, the first parameter for the Dot Function is the Vector we want to Dot towards and the second parameter is the Vector that we're getting from the Gun (the Direction Vector).

---

Vector3 directionVec = Enemy.Position - Gun.Position;
Vector2 dotVec = new Vector2(/*Front-Back Value*/Vec3Dot(Enemy.transform.forward, directionVec),
                                /*Left-Right Value*/Vec3Dot(Enemy.transform.right, directionVec));
//Front-Back value is greater than Left-Right value
if(AbsVal(dotVec.x) > AbsVal(dotVec.y))
{
//Front
if(dotVec.x > 0)
{
//Shot from the Front
}
      //Back
else
{
//Shot from the Back
}
}
//Left-Right value is greater than Front-Back
else
{
//Right
if(dotVec.y > 0)
{
//Shot from the Right
}
//Left
else
{
//Shot from the Left
}
}

Wednesday, December 11, 2013

Meeting Joe Barnes

Meeting someone so technologically focused like Joe was a great experience. Joe was, at the time, working as a Technical Director for Disney. He's been in the industry for 16 years, so Joe is a man with experience. He explained all of the various technical challenges he faced and gave us an important insight into what we might face if we're placed into a tech-oriented position.

He talked over what his forte or niche was, which to him was making the engine itself work. Joe liked to get down into the nitty-gritty parts of the engine and make all of the pieces fit together and work correctly. It was also a very big point to him that whenever code get's committed to a codebase it MUST be of the highest quality coding. That codebase is something that various other people may use and if it is not clean and concise in what it is doing, or if it is hard to use and easily confuses people, then it shouldn't be committed to the base.

Over his interview he also provided us with a few nifty tips that we should keep in mind when getting hired and working. So a few of the main points that Technical Directors look for when hiring is: strong proficiency in the language of that company's choice, an interest in the language so you're committed to it, knowing the ramifications of each line of code, being an excellent problem solver, and of course being a good team player. Being cocky and a know-it-all isn't going to help you impress the person hiring you. Also he explained how development kits are tricky to work with. Since development kits have extra memory built into them for debugging tools the line between how much memory a real system has vs how much memory a dev kit has is kind of hard to notice. Often times games leek over into that extra memory and when they start preparing to ship for launch the team will realize that the normal consoles now don't have enough memory. Joe also remarked how he doesn't actually find comments helpful in industry. While comments are usually a good idea in practice, it becomes inefficient in the actual workplace. Often comments are poorly done and even if they are well done they can quickly become obsolete the useless. Instead of documenting the entire process in comments, one should code their project in a simple and straightforward enough manner that anyone looking though it could piece together how it works.

Friday, November 22, 2013

How to: Breakable Models in Unity

Tools Required:

  • 3D modelling software capable of exporting an .obj file
  • Blender
  • Unity
-----
To get started, make your object in the 3D modelling software of your choice (for this example I am using Maya).


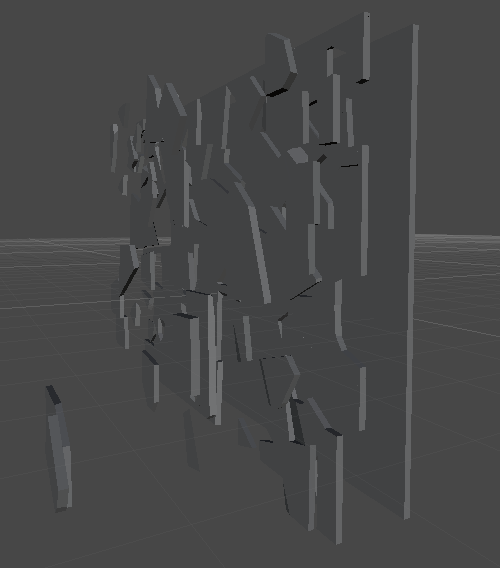
Export that object to an OBJ file and import said file into Blender. In Blender one will need to go into the plugins and turn on Cell Fracturing. With that enabled there will now be a Cell Fracture button in the Objects Tool pane when selecting an object. We'll be using that tool to separate the model into tinier chunks that we'll be using as debris in Unity. Here's also where the trial and error comes in! Playing around with the setting and testing will be the best way to make a model that will shatter in the size and way you want. In the picture you'll be able to see my favored settings. Feel free to use those and see how it works with your model.


Then press 'okay' to allow the program to work through the model. Blender will begin splitting the model on the screen. Do not interact with it or close the program, just let it run its course. If the splits you decided to make aren't too small or plentiful then the model should be cut relatively quickly.


Now that we have a model with all of the broken up pieces we need we'll once again import the entire model as an FBX this time so we can use it in Unity. Once you have the FBX dragged and dropped into Unity we can start interacting with it in the engine.

Firstly, make sure the object's imported model has the Generate Colliders box checked. As the object is right now we don't have any of the necessary components on it to do our interactions, so we'll have to add them. First off, delete the Animator component of the object. It won't be needed for this tutorial. Next we'll need to add a RigidBody, Mesh Collider, Mesh Renderer and whatever other scripts we wish this object to hold. Once those are added, before proceeding, go into the Mesh Collider tab of the object and set it's mesh to the original model of the object. This model will have been included when you exported from Blender and will look like the object without being cut up. You can also freeze the constraints of the object, choose to use gravity or alter the mass of the object while we're here.


Now that we have the object created we need to affect it in the main script we have for running the level. Where the object is made in code, we'll also have to make an array of MeshColliders. This array will house all of the chunks we made via Blender and allow us to interact with each of them individually. However two extra items will be added to the front of the array that has to be dealt with. The first or [0]'th spot in our array is the model that is used as the object's collision. It is essentially an uncut version of the object. Unfortunately it is also visible so we'll need to turn it invisible so the chunk can be noticeably affected. To do this we'll call the [0]'th spot in our array and get the object's MeshRenderer before setting its 'enabled' boolean to false. By doing this we'll be turning off the rendering of the mesh, making it so we can still interact with the object just not see it. After that there's still one more object in our array that will mess with our functions. In the second or [1]'st spot of the array is the actual uncut base model of the object. It has been passed along between all of the editors and is just sitting in our array. We have to deal with it because otherwise our chunks automatically detect that they're colliding with it and explode outward. While impressive, it isn't helping us out.


So the best way to deal with this extra model is to just delete the [1]'s gameObject. Next, the best choice of action is to create a for loop that iterates over every chunk in our array. Inside this for loop we'll apply any alterations of the chunk's properties to all of the chunks. Firstly, we'll have to add rigidBodies to all of our chunks otherwise they won't interact with things as they should. As well, we need to set the MeshCollider component's 'convex' boolean to true for all of the children, thus allowing it to react to the chunk's specific model. I also recommend turning off gravity and freezing their constraints once more, just to be safe.

Now we'll need to make and add a script to the object that will be its manager when it is struck. To have the object detect when something has collided with it we'll use the OnCollisionEnter(Collision collision) method. This method automatically detects if another object is intersecting this one. So the first thing that has to happen in this code is that it has to detect that the object that is hitting it is the actual object that is supposed to hit it, instead of say something like the floor or character (unless of course you're planning for it to collide with those). So to detect this the object that is hitting has to have it's own manager. If it does, then we can use an if statement like such: if(collision.gameObject.GetComponent<ObjectManager>() != null). Doing that will check to determine if the colliding object has the ObjectManager we're expecting to collide with.
Now we can't just simply allow the object to react since the reaction it will do will be applied to the whole object instead of the chunks it collided with. We have to determine which chunks the colliding object will be reacting with. To do this we'll need to create a new array of Colliders and set that array equal to a Physics OverlapSphere. What this overlap sphere does is generate an invisible sphere on the colliding object which will detect all of the chunks that it is going to collide with. An example would look like such: Collider[] hitCollider = Physics.OverlapSphere([Here we pass in the position of our colliding object], [and here we pass in the scale or size of the OverlapSphere. I suggest using a value from 0.5 to 1, otherwise the sphere gets too large and starts making unnatural collisions]);
Now that we have all of the chunks we're colliding with we have to iterate over all of them and interact with the struck ones. We do this via another for loop of course! This time we'll iterate over the length of the Collider array we made. Inside the loop we'll use whatever physics or interactions we wish to apply to the hit chunks.


---
And that is how you create a breakable object and interact with its parts in Unity. Thank you for reading!